How to use car headlight adjustment button correctly
Car headlights are one of the very important devices for drivers when driving, especially driving at night.
However, not all drivers know how to adjust car headlights properly, leading to difficulties in driving.
What are car headlights?
Car headlights are lighting devices that help drivers have a wider view.
However, unlike other types of lights, headlights can create a strong and concentrated beam of light, capable of illuminating 100m or more, helping drivers to observe well and easily detect obstacles or vehicles traveling in the opposite direction.
To maximize illumination, headlights can be used in combination with low beam lights - near beam lights.
Thereby, helping the driver to control speed and handle all unexpected situations on the road.
There are four most popular types of car headlights on the market today: halogen, xenon - HID, LED and laser.

How to adjust car headlights properly
There are quite a few drivers who do not adjust their headlights properly, causing safety risks for the driver and others around them when driving. Here is how to adjust headlights properly:
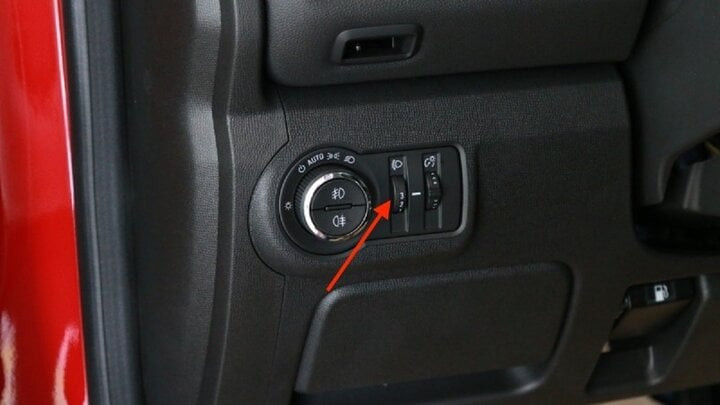
For xenon headlights:Some cars are equipped with xenon lights, the driver can adjust the light beam according to the load and speed of the vehicle. Therefore, these cars are often equipped with a rotary knob to adjust the headlights with control buttons from 0 to 4. When meeting opposite vehicles or handling situations that occur on your journey, the driver only needs to control from 0 to 4 depending on the desire.
For halogen headlights:For halogen headlights, the driver can adjust them with the 3-point screws behind the lights with the symbols U - D and L - R
When screw U – D is pressed, the headlights will point up or down.
When L-R is pressed, the headlights will shine to the right or left.
Steps to adjust car headlights properly
Step 1: Balance the vehicle by inflating the tires evenly and cleaning the lenses.
Before adjusting the car headlights, you need to ensure the balance of the car by pumping the tires just enough, not too tight or too loose. Thus, adjusting the headlights will be accurate.
In addition, after placing the vehicle in a balanced position, you need to clean the outside lenses, only then can you observe and align the light beam most accurately.
Step 2: Determine the location of the light beam
To accurately determine the position of the headlight beam, you need to perform the following operations:
Park the car on a flat, level ground. Keep a distance of about 5m to 7m from a wall or barrier to test the lights.
You draw a vertical line down the center, perpendicular to the ground (or floor) on the wall or screen.
Align the centerline of the vehicle so that the centerline of the vehicle is opposite the line you just drew above to accurately determine the position of the headlight beam.
Step 3: Measure the distance to the center of the car light
To align the car headlights properly, you cannot skip the step of measuring the distances to the center of the headlights on the car. These are the distances from the center of the headlights and the height from the ground to the center of the headlights on the car. The distances you get are the basis for the next steps.
Step 4: Draw the cut-of line
On the wall or screen, you draw an out-of line. The height of this line must satisfy the requirement that it is lower than the height of the lamp by about 1 - 2 inches, equivalent to about 2.56 - 5.08cm.
Step 5: Adjust the height of the beam and the heart of the lamp
Start the car at idle speed, turn on and adjust the lights according to the instructions so that the beam angle and height are correct. The beam height must be equal to the height of the headlight bulb on the car and the beam angle should be about 10-15 degrees.
Step 6: Adjust the driver's side light beam so that the height and beam angle meet the standards.
After performing the above steps, you start the car slowly. Then, you turn on and adjust the lights. You should adjust so that the light concentration and the height of the light beam meet the standard. Remember one thing, the height of the light beam you adjust must create a balance with the height of the lamp heart on the car and the light concentration is about 10 - 15 degrees.
Step 7: Adjust the side light beam so that the height and beam angle meet the standards.
Next, you adjust the beam of the driver's headlight. This adjustment also needs to be adjusted so that the height and beam angle meet the standards.
Step 8: Check the two beams
After adjusting the light beam of each side, turn on both lights and observe if the two light beams have the same height and light beam convergence. If the two light beams are equal, it is okay.
Step 9: Check
After adjusting the lights on each side as in the steps above, turn on both lights to check if the height and convergence of the two beams are equal. If the results are equal, the adjustment is successful. If not, proceed to adjust them further to reach the standard and equal.
Some notes when adjusting car headlights
When adjusting car headlights, it is necessary to adjust the light's convergence to low beam mode.
When checking the headlight toe-in, to ensure accuracy, cover the low beam or disconnect the wiring.
When checking the driver's side headlight, you need to cover the passenger side headlight. Conversely, when checking the passenger side headlight, you cover the driver's side headlight.
You should not cover your car lights for too long, just under 3 minutes to ensure that the headlights do not burn out because covering for too long generates a lot of heat.
After following a series of steps as instructed above, an important step you cannot skip is to test drive the vehicle and check if the headlight system is working in good condition.
To use the headlights most effectively, you should regularly check the lights for damage or burnt bulbs to replace or repair them promptly. Occasionally, you also need to clean and wipe the lights to ensure that the brightness of the lights is not obscured by dirt.
Headlights should be used on highways, avoid using them on two-way roads, as they can often blind oncoming drivers and make them unable to see the road.