
Dual booting Windows 11 and Linux Mint: A Complete Guide
Leverage the power of both operating systems on a single computer. This guide provides detailed steps for preparing, partitioning your hard drive, and installing Linux Mint alongside Windows.
Installing Linux Mint alongside Windows 11 or Windows 10, also known as dual-booting, allows users to fully utilize the hardware power of their computer for both operating systems. Unlike using virtual machines (VMs) or Windows Subsystem for Linux (WSL), this method provides maximum performance and the most complete experience for each platform.
This guide will detail the process of setting up a secure dual-boot system, from creating a bootable USB drive and partitioning the hard drive to the final configuration steps. It's also a solution for those who want to explore Linux Mint as a potential alternative as Windows 10 support ends in October 2025.
Why should you dual-boot instead of using a virtual machine?
While WSL and virtual machines are convenient tools for running Linux inside Windows, they have performance limitations due to the need to share system resources. With a dual-boot configuration, each running operating system has full access to the CPU, GPU, RAM, and other hardware components, ensuring that original performance is not degraded. This is especially important for resource-intensive tasks such as programming, graphics processing, or gaming.
Preparation required before installation
Before starting, thorough preparation will help ensure a smooth process and minimize the risk of data loss. The steps to take include:
- Back up all your data:This is the most important step. Although the process is relatively safe, manipulating disk partitions always carries risks. Make a full backup of your computer.
- Temporarily disable BitLocker:If your computer has BitLocker disk encryption enabled, temporarily disable it to avoid problems during partitioning and installation. You can re-enable it after completion.
- Prepare the tools:You will need a USB drive with a minimum capacity of 8GB, the Linux Mint installation ISO file, and a bootable USB creation tool like Rufus.
Detailed installation procedure
The installation process consists of three main stages: creating a bootable USB drive, preparing disk space on Windows, and finally installing Linux Mint.
Step 1: Create a Linux Mint bootable USB drive.
Rufus is recommended for its simplicity and effectiveness in creating bootable USB drives for both BIOS and UEFI systems.
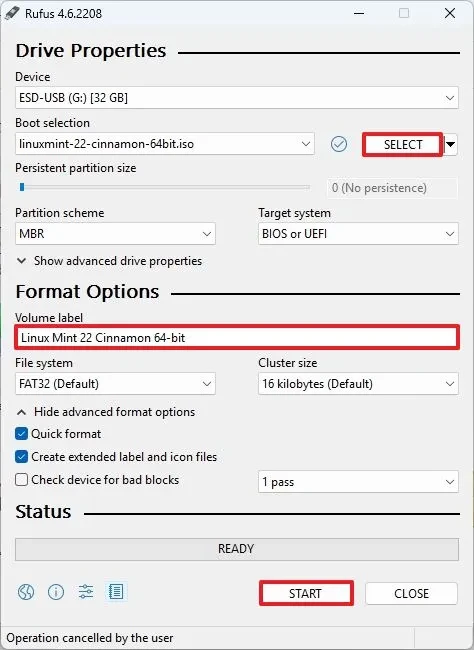
- Download the ISO file of the Linux Mint version you want to install (e.g., Cinnamon Edition) from the official website.
- Download the latest version of the Rufus tool.
- Plug the USB into your computer and launch Rufus.
- In the sectionDeviceChoose the correct USB drive for your device.
- Press the buttonSortand locate the downloaded Linux Mint ISO file.
- Keep all other default settings and pressStart.
- Confirm the following dialog boxes so Rufus can begin the USB creation process.
Step 2: Allocate disk space for Linux
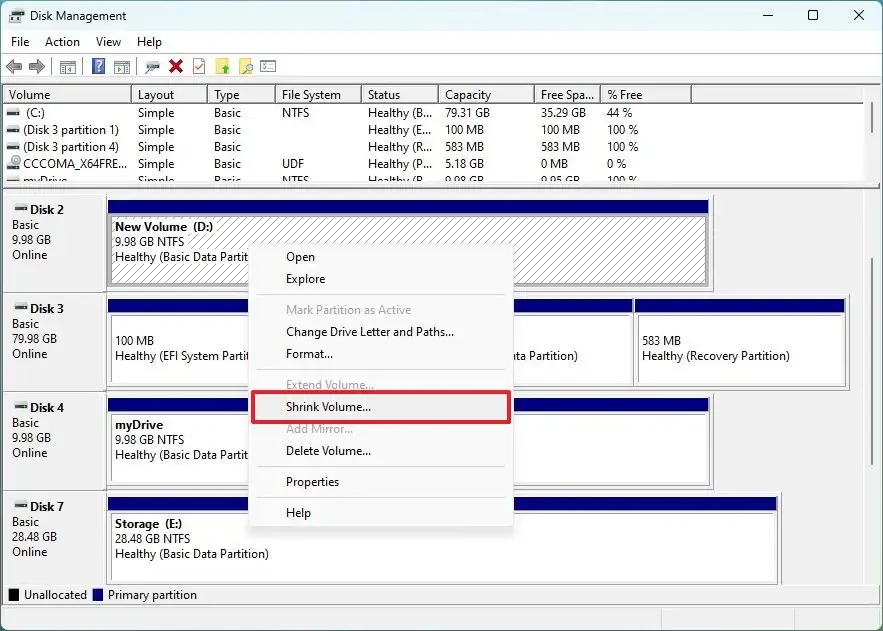
To install Linux Mint, you need to create free space on your hard drive. The safest way is to use the Disk Management tool available in Windows.
- Right-click on the Start menu and selectDisk Management.
- Right-click on the primary drive partition (usually drive C:) and selectShrink Volume.
- In the "Enter the amount of space to shrink in MB" box, enter the amount of space you want to allocate for Linux Mint. The minimum is 20GB (20480MB), but it is recommended to allocate at least 100GB (102400MB) for a comfortable experience.
- Press the buttonShroomAn "Unallocated" field will appear.
Step 3: Install Linux Mint alongside Windows
Once you have a bootable USB drive and free space, you can begin the installation.
- Restart your computer with the USB drive plugged in. You may need to access the BIOS/UEFI menu (usually by pressing F2, F12, DEL, or ESC) to select booting from USB.
- From the Linux Mint startup menu, select"Start Linux Mint".
- On the desktop, double-click the icon."Install Linux Mint".
- Select your language, keyboard layout, and continue. You can choose to install additional multimedia codecs.
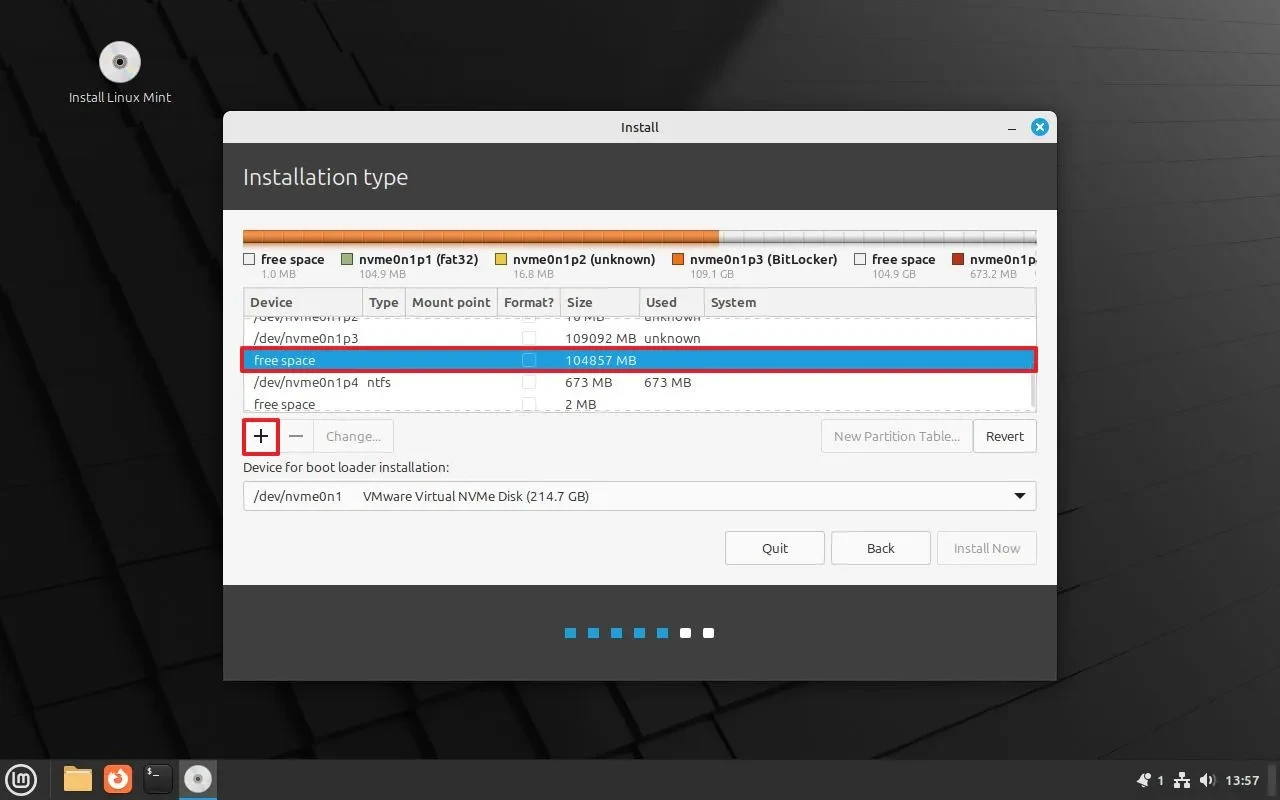
- On the screen"Installation type", select option"Something else"This is an important step to control the installation process.
- Select region"free space"(empty space) you created earlier and click the "+" sign.
- In the new window, setMount pointwall"/"(This is the root partition). Keep all other settings as they are and press OK.
- Press"Install Now"and confirm the changes.
- Next, select your time zone and create a user account for Linux Mint.
- When the installation process is complete, press"Restart Now", remove the USB and press Enter.
Post-installation configuration and important notes.
After restarting, you will see the GRUB (Grand Unified Bootloader) boot menu. This is the boot manager that allows you to choose whether to boot into Linux Mint or Windows. By default, Linux Mint will be the preferred operating system. To boot into Windows, you need to select the option."Windows Boot Manager"from the list.
A successful installation will provide a flexible system, allowing you to switch between the stability of Windows for work and entertainment, and the power and security of Linux Mint for programming or system administration tasks.