
Recreating the Windows 11 Recovery Partition: A Detailed Guide
Is your Windows 11 Recovery Partition (WinRE) corrupted, out of space, or needs to be moved? This guide provides detailed steps to safely recreate it using system tools.
WinRE: What is the hidden 'lifeline' of Windows 11?
The Recovery Partition is a separate area on the hard drive that contains the Windows Recovery Environment (WinRE). This is an essential tool that allows you to troubleshoot serious system problems, restore your computer to its original state, or access advanced boot options without needing the installation disc.
When you use the "Advanced startup" feature in Settings, you are actually booting into this partition. If this partition is corrupted or problematic, Windows 11's self-repair capabilities will be severely affected.
When should you recreate the recovery partition?
Recreating the recovery partition is often necessary in certain specific cases, including:
- Partition is corrupted:The data in the partition is corrupted, rendering the recovery functions ineffective.
- Insufficient storage space:Windows updates may require a larger recovery partition. If there isn't enough space, the update process may fail. The recommended size for creating a new partition is approximately 1GB (1024MB).
- The main drive (C:) needs to be expanded:Sometimes, the recovery partition is located in a position that prevents the expansion of drive C. Moving and recreating it at the end of the drive will resolve this issue.
- The system has multiple recovery partitions:After major upgrades, the system may create redundant recovery partitions. Merging them into a single partition helps clean up the drive.
Warning:The following operations will deeply interfere with the hard drive partition structure. Improper execution may result in data loss or damage to the operating system. Always back up all important data before proceeding.
Option 1: Reuse an existing WinRE file.
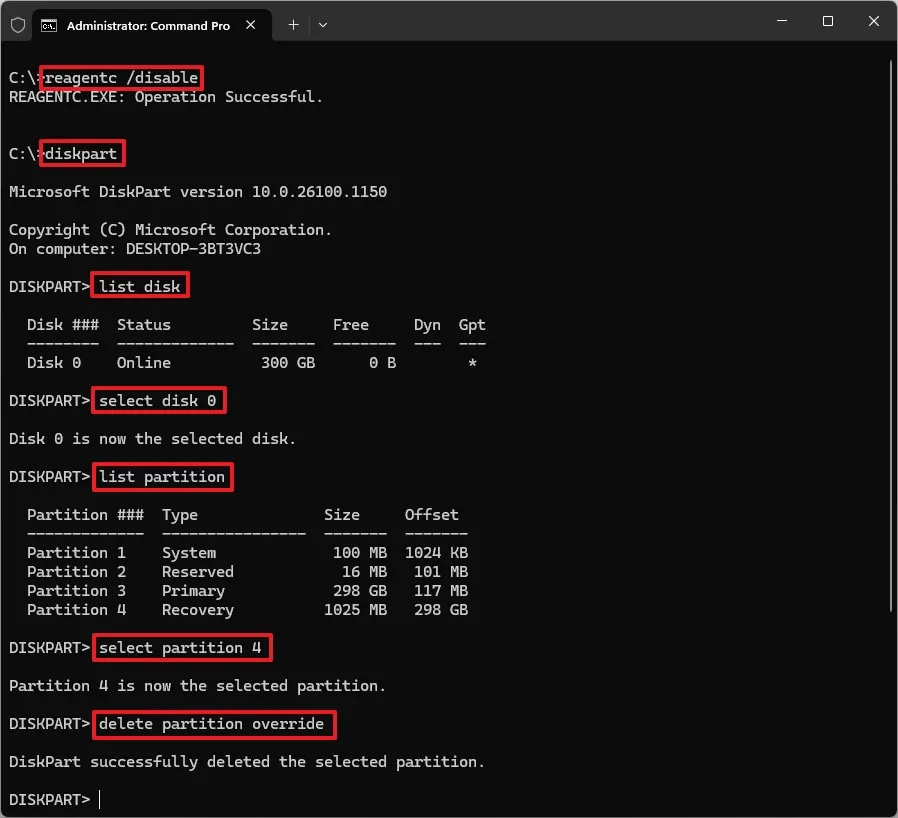
This method is suitable when you need to move or resize a partition but the original recovery files remain intact. This operation will utilize the existing "winre.wim" file.
- OpenStart, search for "Command Prompt", right-click and selectRun as administrator.
- Temporarily disable WinRE using the following command. This command will move the "winre.wim" file to the system folder on drive C.
faultc /disable - Launch the DiskPart partition management tool:
diskpart - List the drives and select the drive containing Windows (usually disk 0):
list diskselect disk 0 - List the partitions to identify the recovery partition that needs to be deleted:
list partition - Select and delete the old recovery partition. Replace it.Xby the sequence number of the recovery partition on your computer:
select partition Xdelete partition override - Create a new primary partition. You can use the free space you just created.
create partition primary - New partition format according to NTFS standard:
format fs=ntfs quick - Set this partition as your recovery partition and protect it:
set id=de94bba4-06d1-4d40-a16a-bfd50179d6ac overridegpt attributes=0x8000000000000001 - Exit DiskPart:
protection - Reactivate WinRE. The system will automatically copy the "winre.wim" file to the new partition.
responsibility / enable - Check the status again to ensure the process was successful:
diagnosisc /info
Option 2: Create a completely new installation from the Windows 11 installation files.
Use this method when the old partition is completely corrupted or the recovery files are faulty. You will need a Windows 11 installation ISO file or a bootable USB drive.
- OpenCommand Promptwith administrator and launch privilegesDiskPart.
- Use the commands
list disk,select disk 0,list partition,select partition X, anddelete partition overrideTo delete the old recovery partition, follow the instructions above. - Create a new partition with the recommended size of 1024MB:
create partition primary size=1024 - Format and set properties for the new partition:
format fs=ntfs quickset id=de94bba4-06d1-4d40-a16a-bfd50179d6ac overridegpt attributes=0x8000000000000001 - Exit DiskPart:
protection - Mount the Windows 11 ISO file or connect the USB installation drive. Remember its drive letter (e.g., D:).
- Create a temporary folder to work in:
mkdir "%USERPROFILE%\Downloads\Images" "%USERPROFILE%\Downloads\Mount" - Copy the "install.wim" file from the installer to the temporary folder. ReplaceD:using your drive letter:
xcopy "D:\Sources\install.wim" "%USERPROFILE%\Downloads\Images\" /H /E /C /I /Y - Mount the "install.wim" image file. Note:/Index:6This corresponds to the Windows 11 Pro version. You may need to change this number for your version.
dism /Mount-Image /ImageFile:"%USERPROFILE%\Downloads\Images\install.wim" /Index:6 /MountDir:"%USERPROFILE%\Downloads\Mount" - Copy the necessary recovery files to the system:
xcopy "%USERPROFILE%\Downloads\Mount\Windows\System32\Recovery\winre.wim" "C:\Windows\System32\Recovery\" /H /E /C /I /Yxcopy "%USERPROFILE%\Downloads\Mount\Windows\System32\Recovery\reagent.xml" "C:\Windows\System32\Recovery\" /H /E /C /I /Y - Activate WinRE and check its status:
responsibility / enablediagnosisc /info - Clean up temporary files:
dism /Unmount-Image /MountDir:"%USERPROFILE%\Downloads\Mount" /discarddism /Cleanup-Wim
Once complete, you can delete the "Images" and "Mount" folders in the Downloads folder. Mastering these steps will give you more control over managing and maintaining your Windows 11 system, ensuring recovery tools are always available when needed.