Mapping network hard drives in Windows 11: A guide to 3 effective methods.
Discover how to turn shared folders into local drives on Windows 11 using File Explorer, Command Prompt, and PowerShell for quick and convenient data access.
Network drive mapping is a useful feature in Windows 11 that allows users to connect to and access a shared folder over a network as if it were a local drive on their computer. This simplifies remote data access and optimizes workflows. Once set up, the network drive will appear in the "This PC" section of File Explorer, providing a seamless experience.
This article will provide detailed instructions on three methods for mapping and disconnecting network hard drives on Windows 11, including using the File Explorer graphical interface, the Command Prompt command-line tool, and PowerShell.
Guide to mapping network hard drives on Windows 11
Depending on your needs and usage habits, you can choose one of the following three methods to set up a network drive on your Windows 11 computer.
1. Using File Explorer: The most intuitive method
This method is simple and suitable for most users thanks to its familiar graphical interface.
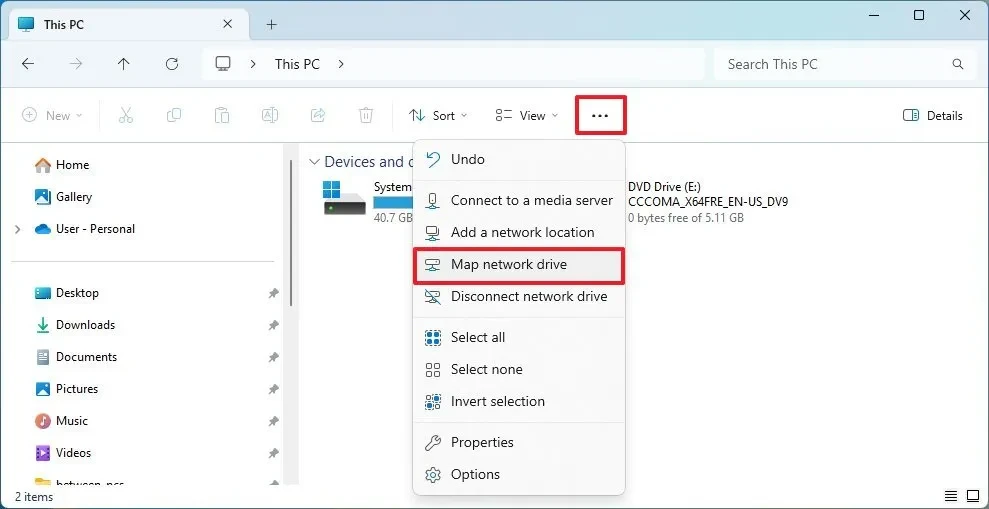
- OpenFile Explorerand chooseThis Passwordfrom the left navigation bar.
- Click the three-dot icon (...) on the toolbar and selectMap network drive.
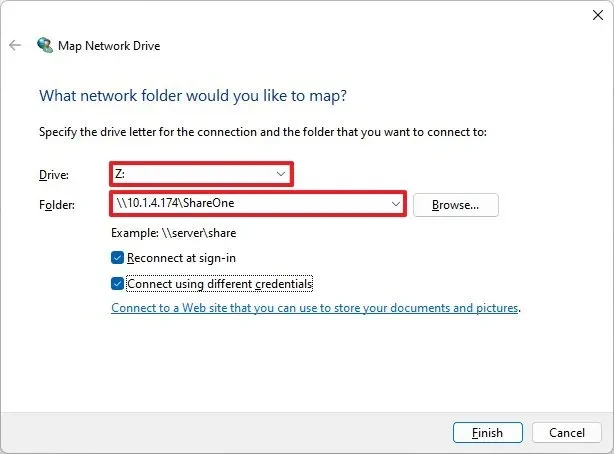
- In the new window, select a drive letter from the drop-down menu.cup.
- At the boxFolder, enter the network path of the shared folder in the format\\SERVER-NAME\FOLDER-NAMEYou can also pressBrowsefor manual searching.
- Check the boxReconnect at sign-inIf you want the drive to automatically reconnect after each computer startup.
- If you need to use a different account than your current Windows account, selectConnect using different credentials.
- PressFinishTo complete the process, if prompted, enter your login information for the network account.
2. Using Command Prompt: An option for advanced users
Command Prompt provides a fast, command-line-based method suitable for automation or system administration.
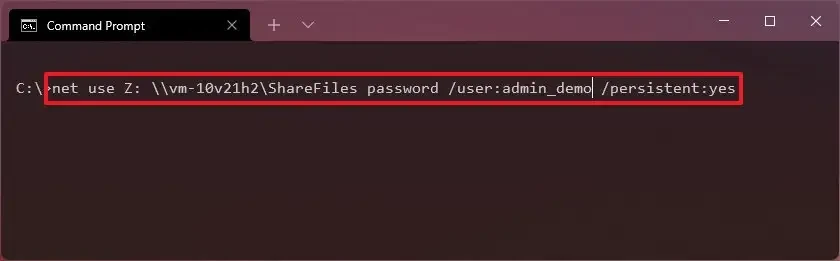
- Open menuStartSearch for "Command Prompt" and open the application. Note that it does not need to be run with administrator privileges.
- Use the following command and press Enter.Enter:
net use Z:\\DEVICE-NAME\SHARED-FOLDERIn this case, replace "Z:" with the drive letter you want to assign, "DEVICE-NAME" with the name or IP address of the server, and "SHARED-FOLDER" with the name of the shared folder.
- To permanently map and provide login credentials, use a more complex command:
net use Z:\\DEVICE-NAME\SHARED-FOLDER-FOLLOW PASSWORD /user:USER-NAME /persistent:yes
3. Using PowerShell: A powerful and versatile tool.
PowerShell is a more modern command-line tool, offering many advanced options for system management.
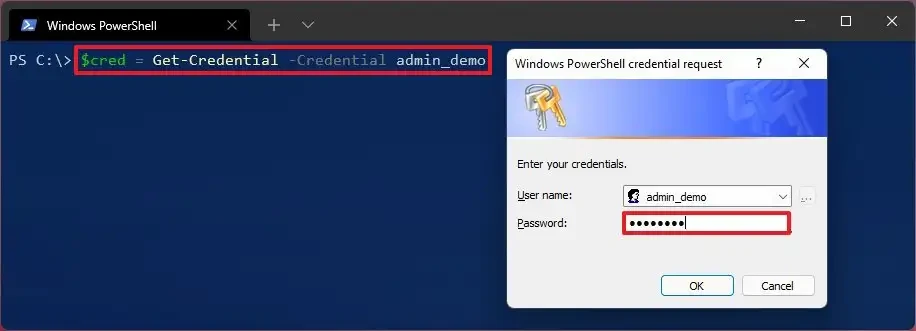
- Open menuStart, search for "PowerShell" and launch the application.
- Type the following command to map the drive and press Enter.Enter:
New-PSDrive -Name "Z" -PSProvider "FileSystem" -Root "\\DEVICE-NAME\SHARED-FOLDER" -PersistReplace "Z" with the drive letter and corresponding network information.
- To use custom login credentials, you need to create a variable containing the credentials before executing the mapping command.
How to disconnect a mapped network hard drive
When you no longer need to use it, you can easily disconnect the network drive using the appropriate tools.
1. Disconnect from File Explorer
- OpenFile Explorerand accessThis Password.
- In the "Network locations" section, right-click on the network drive you want to disconnect.
- SelectDisconnectfrom the context menu.
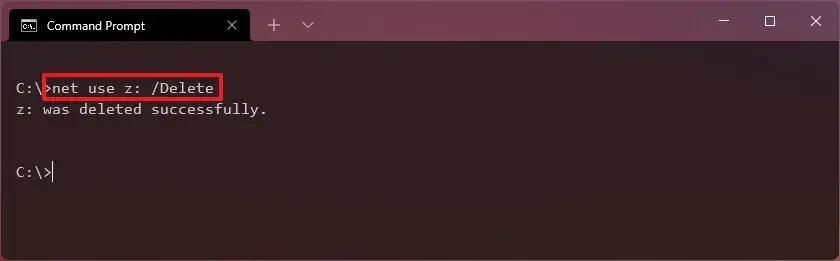
2. Disconnect using Command Prompt
Using the following command, replace "Z:" with the drive letter you want to delete:
net use Z: /Delete
3. Disconnect using PowerShell
Using the following command, replace "Z" with the drive letter you want to delete:
Remove-PSDrive -Name Z
Important notes when carrying out the task.
- Use the IP address:If connecting using the computer name fails, try using the remote device's IP address. However, note that dynamic IP addresses may change.
- Account without password:If the device sharing resources uses a Microsoft Account with the passwordless sign-in option, you may need to create a local account on that device to establish the connection.
- Administrator privileges:When using Command Prompt or PowerShell, do not run them with administrator privileges because the mapped drive may not show up in File Explorer.

