Decoding Windows 10 Cache: Mechanism, Benefits, and Limitations
Windows 10 Cache Analysis: How the system clears temporary files, DNS, Windows Store, and location using built-in tools; performance benefits, storage space, and limitations.
The cache in Windows 10, similar to that in web browsers, can help troubleshoot problems, improve performance, and free up disk space. This article analyzes the cache layers maintained by Windows 10 and how the operating system cleans them using built-in tools: Disk Cleanup, the ipconfig /flushDNS command, the wsreset.exe utility for the Windows Store, and clearing location history in Settings.
Why does Windows 10 need to clear its cache periodically?
According to the source material, clearing the cache is a good first step in fixing system errors, optimizing performance, and reclaiming space. Over time, temporary files and intermediate data can accumulate, filling up the disk and affecting the user experience. Cache clearing focuses on data that can be safely deleted, resulting in a cleaner system session.
Main cache layers and cleanup mechanisms in Windows 10
Temporary files with Disk Cleanup
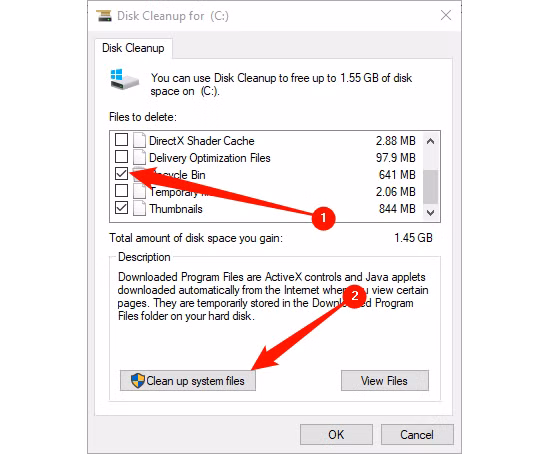
Disk Cleanup calculates the amount of space that can be freed on the hard drive (default is the operating system drive). Users scroll and select Temporary Files; additional locations such as the Recycle Bin and Downloads can also be selected. Then, select Clean Up System Files, confirm the categories to delete again, press OK, and Delete Files to begin the process. Disk Cleanup will remove unnecessary files and may take several minutes to complete.
Use DNS Resolver cache with the command ipconfig /flushDNS
To clear the DNS cache, open Command Prompt with administrator privileges (Run as Administrator). Run the command:ipconfig /flushDNSThe system will return a confirmation message that the DNS Resolver cache has been successfully cleared. According to the source, you can perform this operation using PowerShell if you wish.
The Windows Store cache is cached using wsreset.exe.
Open the Run dialog box (Windows+R), typewsreset.exeand press OK. A black window will briefly appear to clear the cache, then the Windows Store will launch with a blank screen and loading icon. When the black window closes, the cache has been cleared and the Store app will open; you can close the Store window if you don't need to use it.
Location history in Settings
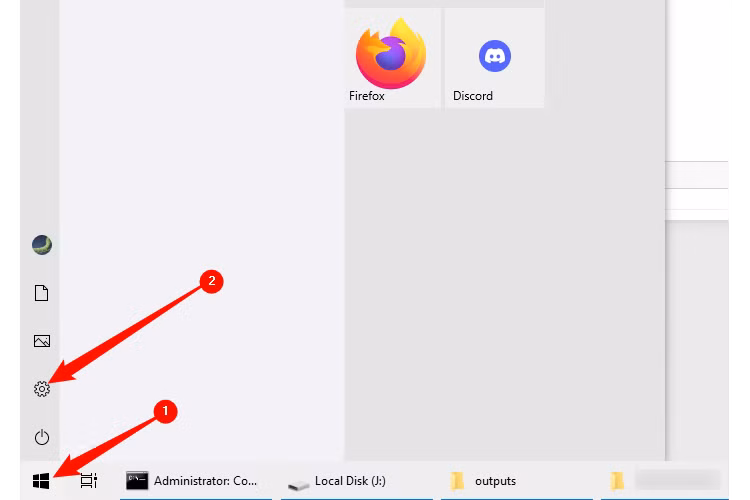
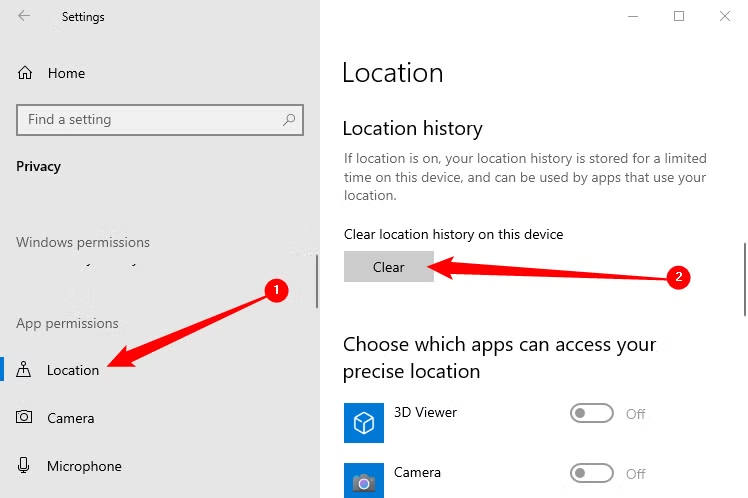
Open Settings (Windows+i), go to Privacy. In the left pane, select Location. Under Location, tap Clear under Location History On This Device to delete saved location history on your device.
Summary of tools and tasks for clearing the cache.
| Cache type | Tools/Commands | How to activate | Results/Confirmation |
|---|---|---|---|
| Temporary file | Disk Cleanup | Find Disk Cleanup in Start, select Temporary Files, select Clean Up System Files, click OK, and then Delete Files. | Delete temporary files; this process may take several minutes. |
| DNS Resolver Cache | ipconfig /flushDNS | Command Prompt (Run as Administrator); PowerShell can also be used. | Notification: DNS Resolver Cache successfully cleared. |
| Windows Store | wsreset.exe | Run (Windows+R) → type wsreset.exe → OK | A black window briefly appears; the Windows Store launches after the cache is cleared. |
| Location history | Settings → Privacy → Location | Tap Clear under Location History On This Device | Location history on the device has been deleted. |
Advantages and practical impacts
- Troubleshooting: A good starting point when encountering system errors (according to the source).
- Improved performance: Reduced impact of temporary data accumulation on user experience.
- Free up space: Reclaim space from temporary files, the Recycle Bin, or the download area when selected.
- Based on built-in tools: No additional software installation required; operate directly within Windows 10.
Limitations and points to note
- Confirm permanent deletion: Disk Cleanup displays a warning; if you selected Recycle Bin or Downloads, consider carefully before deleting.
- Administrator privileges: To delete DNS, you need to run Command Prompt with administrator privileges.
- Processing time: Clearing temporary files can take several minutes depending on the volume of data.
- Distributed operations: Each type of cache resides in a different tool/path (Disk Cleanup, Command Prompt, Run, Settings), requiring separate execution.
Brief comparison and usage guidelines
Sources indicate that clearing the cache on Windows 10 is “similar to clearing the browser cache” in terms of troubleshooting, speeding up, and saving space. The difference lies in the scope: browsers only affect browsing data, while Windows 10 organizes multiple layers of system cache such as temporary files, DNS, Windows Store, and location history, each with its own cleanup tool.
Among the built-in tools, Disk Cleanup is suitable for large-scale cleanup of temporary files and areas like the Recycle Bin or Downloads; ipconfig /flushDNS focuses on the domain name resolution layer; wsreset.exe is specialized for the Windows Store; and Settings handles location data. Depending on the problem (Store application issues, DNS resolution anomalies, or a full disk due to temporary files), users choose the right tool for noticeable results.
Conclude
Clearing the cache on Windows 10 is a simple system operation but yields practical results: troubleshooting, improving performance, and freeing up space. With the four built-in tools listed above, users can proactively and safely manage each cache layer in a controlled manner.

