Out of space on your C drive? 4 ways to change partitions in Windows 11.
This guide provides detailed instructions on four safe methods to shrink or expand hard drive partitions on Windows 11, helping you optimize storage space without losing data.
Managing storage space is a crucial need for Windows 11 users, especially when increasing system drive capacity or utilizing unallocated space. This operating system provides several built-in tools that allow you to safely resize partitions without reformatting or losing data.
This article will provide detailed instructions on four methods for shrinking and extending a partition on Windows 11, from intuitive graphical interfaces to powerful command-line tools, applicable to both internal and external hard drives.
Using Settings: Modern and intuitive interface
This is the simplest and most suitable method for average users, accessed through the new Windows 11 setup interface.
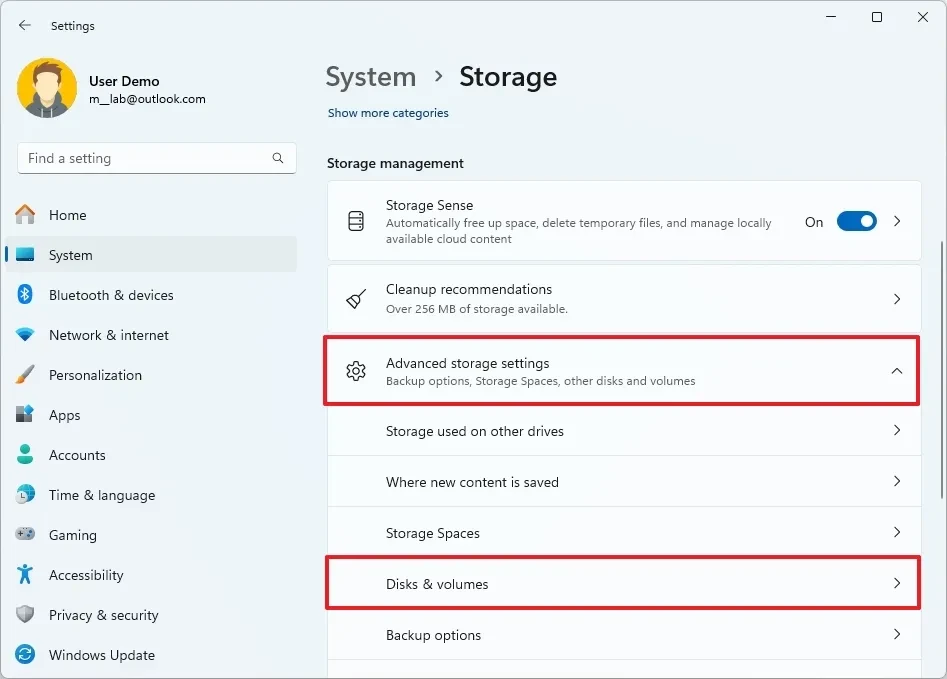
- Open the applicationadjustingby pressing the key combinationWindows + I.
- Navigate to the itemSystemand chooseBrain.
- In the "Storage management" section, click onAdvanced storage settings, then selectDisks & volumes.
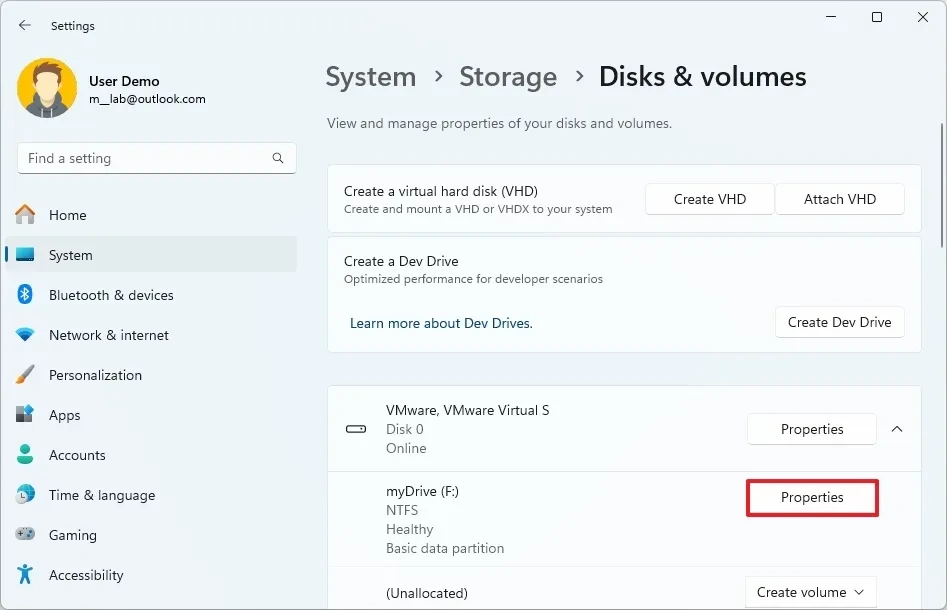
- Select the drive containing the partition you want to modify.
- Select the specific partition and click the button.barrier.
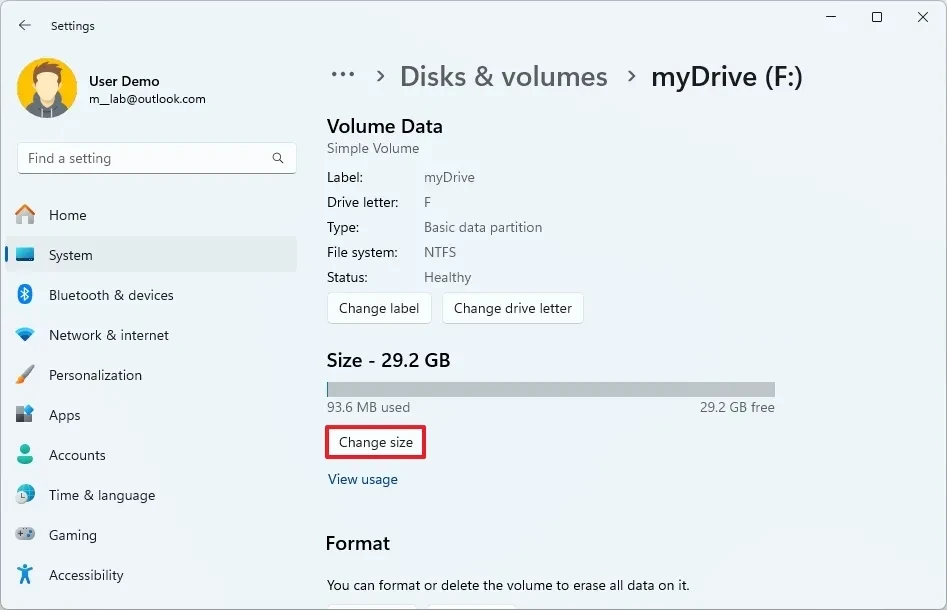
- In the "Size" section, click the button.Change size.
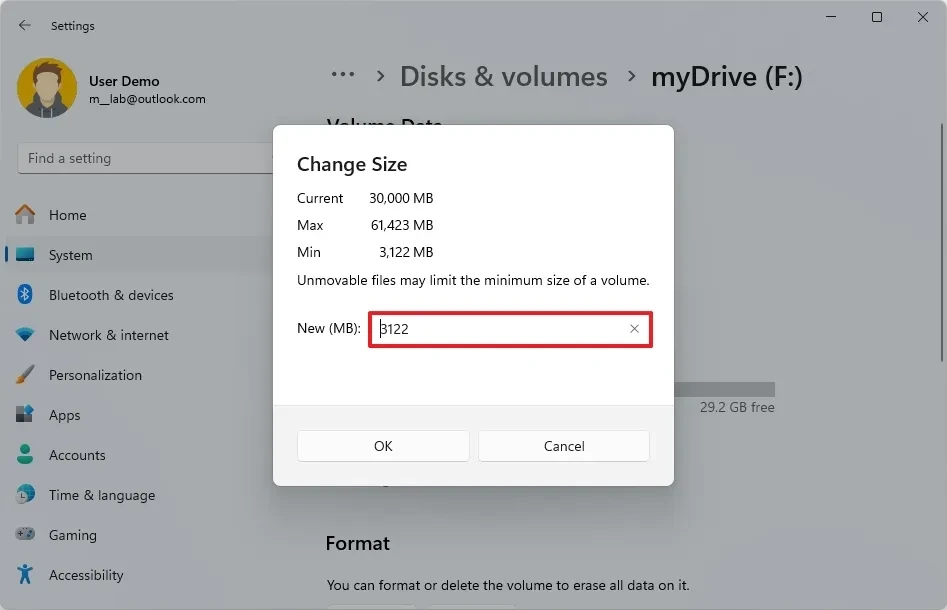
- Enter your desired new size. To shrink, enter a number smaller than the current size. To expand, enter a number larger but not exceeding the maximum allowed size.
- ClickOKTo confirm the change.
Disk Management: A specialized disk management tool.
Disk Management is a traditional and powerful tool that offers more control than the Settings app.
Shrink the partition (Shrink Volume)
- Press the key combinationWindows + Xand chooseDisk Managementfrom the menu.
- In the Disk Management window, right-click the partition you want to shrink and selectShrink Volume.
- In the dialog box that opens, enter the amount of space you want to shrink in the "Enter the amount of space to shrink in MB" field.
- Click the buttonShroom.
Once complete, you will see a new unallocated space created on the drive.
Extend Volume
Note that to extend a partition, there must be an unallocated space immediately behind it.
- OpenDisk Management.
- Right-click on the partition you want to extend and selectExtend Volume.
- The Extend Volume Wizard will appear, clickNext.
- The tool will automatically select adjacent free space. You can adjust the amount you want to use or leave it as default to use the entire space.
- ClickNextand thenFinishTo complete.
Command Prompt (DiskPart): An option for advanced users.
DiskPart is a command-line utility that allows for high-precision management of drives, partitions, and volumes.
Shrink partition
- OpenStart, search for “Command Prompt”, right-click and selectRun as administrator.
- Type the command
diskpartand press Enter. - Type
list volumeto see a list of available volumes. - Type
select volume X(Replace X with the number of the volume you want to minimize) and press Enter. - To minimize, use the command
shrink desired=YYYY(Replace YYYY with the desired size reduction in MB).
Expand partition
- Follow steps 1-4 as above to select the volume you want to expand.
- Ensure there is adjacent unallocated space.
- Type the command
extend size=ZZZZ(Replace ZZZZ with the desired expansion capacity in MB). If the size is not specified, the command...weightWe will utilize all of the adjacent vacant space.
PowerShell: Automating Partition Management
PowerShell is the most powerful command-line tool on Windows, enabling the execution of complex tasks and automation.
Shrink partition
- OpenStart, search for “PowerShell”, right-click and selectRun as administrator.
- Use the command
Get-Partitionto see a list of partitions. - Use the following command to minimize:
Resize-Partition -DiskNumber D -PartitionNumber P -Size S. In there:- DThis is the drive number.
- PThis is the partition number.
- SThis is the new size of the partition (e.g., 50GB).

Expand partition
- OpenPowerShellwith administrator privileges.
- Determine the number of drives and partitions as described above.
- Use the command
Resize-Partition -DiskNumber D -PartitionNumber P -Size Swith S being the new size, larger than the current size. - To expand to the maximum possible size, you can run the command
Get-PartitionSupportedSizeto find the maximum size and then use it in the command.Resize-Partition.
Distinguishing between Drive, Partition, and Volume
In the management process, a clear understanding of terminology is crucial:
- Drive:It is a physical storage device, such as an HDD or SSD hard drive.
- Partition:A partition is a logically separated portion of a physical drive. A drive can have multiple partitions.
- Volume:A partition is a file system that has been formatted and assigned a letter (e.g., C:, D:). This is where the operating system can store and access data.
Mastering these methods will help you be more proactive in optimizing storage space, resolving capacity issues, and improving system performance on Windows 11.

