
Printer not working on Windows 11? 6 effective solutions.
This guide provides detailed instructions on troubleshooting printer errors on Windows 11, from basic connection checks and running automatic troubleshooting tools to reinstalling drivers.
When your printer isn't working on Windows 11, the cause could stem from various factors such as connection issues, outdated drivers, or a malfunctioning Print Spooler service. Whether you're using an HP, Canon, Brother, or any other brand printer, the troubleshooting steps below can effectively resolve the problem.
The first basic inspection steps
Before implementing complex solutions, start with the simplest actions, which often yield the best results.
1. Restart the printer and the computer.
This is the most basic method for resolving temporary issues. Turn off the printer, unplug the power cord, wait about a minute, then plug it back in and turn it on. If the problem persists, restart your computer. This can fix errors such as Windows 11 not recognizing the USB printer or the device suddenly becoming unresponsive.
2. Check the physical and wireless connections.
Unstable connections are one of the most common causes of printing errors. Thoroughly checking the connections is an essential step.
- For USB printers:Make sure the data cable is securely plugged into both the printer and the computer. Try unplugging and plugging it back in, or using a different USB port on the computer.
- For wireless printers:Check if the wireless function on your printer is enabled. Most printers will have a green Wi-Fi indicator light to signal a successful connection. If other wireless devices are also experiencing problems, you may need to restart your Wi-Fi router.
Use the built-in tools of Windows 11.
The Windows 11 operating system provides useful tools for users to quickly diagnose and troubleshoot problems themselves.
3. Default printer configuration
If you have multiple printers installed, it's possible that print commands are being sent to the wrong device. Resetting the default printer might resolve this issue.
- Openadjustingon Windows 11.
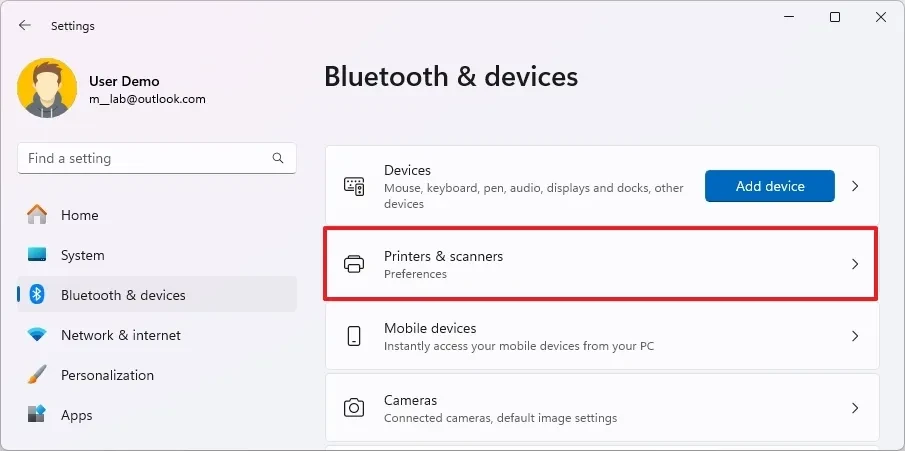
- SelectBluetooth & devices, then enterPrinters & scanners.
- In the “Printer preferences” section, turn off the option “Let Windows manage my default printer”.
- Select the printer you want to use from the list and click the button.Set as default.
Once complete, try printing again. You should also check your print queue to cancel any pending print jobs.
4. Run the printer troubleshooter (Troubleshooter).
Windows 11 has an automatic diagnostic and repair tool. This is an effective solution for problems related to drivers or settings.
- Openadjustingand chooseSystem.
- Click on the tabTroubleshoot, then selectOther troubleshooters.
- Find the itemPrinterand click the buttonRunnext to.
- Follow the on-screen instructions to allow the tool to automatically scan and fix the problem.
More in-depth technical solutions
If the above methods are ineffective, you may need to intervene more deeply into the system to address more complex errors.
5. Reset the Print Spooler service.
When a document gets stuck in the print queue and cannot be canceled, the cause is usually the Print Spooler service. Resetting this service will clear the queue and restart the printing process.
- Open menuStart, searchservices.mscand open the Services app.
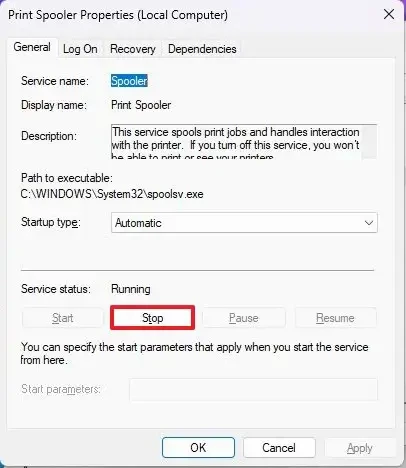
- Find and right-click on the service.Print Spooler, selectbarrier.
- In the General tab, click the buttonStop.
- Open the Run dialog box (Windows + R shortcut), type the following path.C:\Windows\System32\spool\printersand press Enter.
- Delete all files in the “printers” folder.
- Go back to the Print Spooler Properties window and click the button.StartTo restart the service.
6. Reinstall the printer.
If the printer driver is corrupted or a software error occurs, a complete reinstallation may be the last resort. This process involves removing the device and reinstalling it from scratch.
Uninstall the driver
- EnterSettings > Bluetooth & devices > Printers & scanners.
- Select the printer that is experiencing the problem.
- Click the buttonmassiveand confirm.
Reinstall the printer.
- Automatic:For USB printers, simply disconnect and reconnect the cable. For wireless printers, see the relevant section.Printers & scanners, click the buttonAdd deviceTo allow Windows to automatically find and install it.
- Handmade:If Windows doesn't find the printer, click the "Add a new device manually" option. Select "Add a printer using a TCP/IP address or hostname" and follow the instructions to enter the printer's IP address and install the driver.