
Disable your Windows 11 account: 4 ways to do it without deleting it.
Temporarily disable user access on Windows 11 without losing data. Detailed instructions via Command Prompt, PowerShell, and system tools.
When temporarily preventing a user from logging into a Windows 11 computer, disabling the account is a more effective solution than completely deleting it. This method preserves all of the user's files, settings, and applications, allowing for quick access restoration if needed.
The Windows 11 operating system provides many built-in tools to accomplish this, ranging from command-line interfaces like Command Prompt and PowerShell to graphical tools like Computer Management and the Settings application.
Using Command Prompt: The familiar command-line method
Command Prompt is a powerful tool that allows system administrators to perform many tasks, including quickly disabling user accounts.
- Open menuStart, search for "Command Prompt", right-click on the result and selectRun as administrator.
- Enter the order
net userand pressEnterTo list all user accounts on the machine. - Use the following command to disable the desired account:
net user "ACCOUNT_NAME" /active:noPlease replace it."ACCOUNT_NAME"Using your actual account name. For example:net user "Local Demo" /active:no.
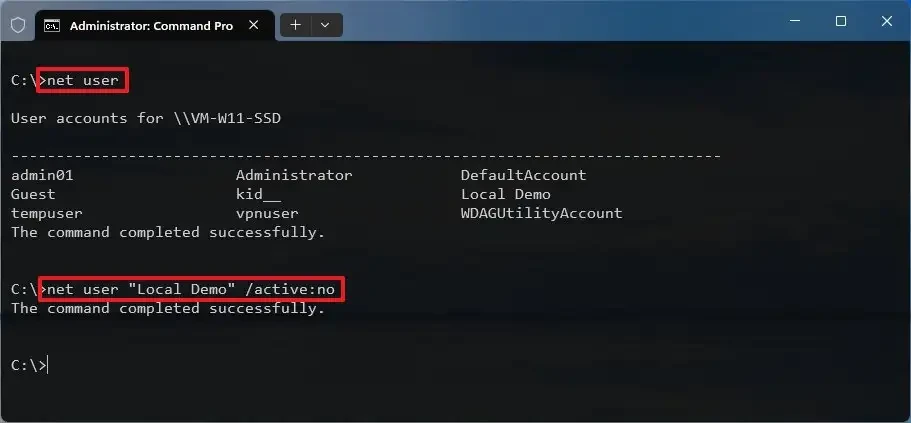
Once completed, the account will be disabled and you will not be able to log in. To reactivate it, simply repeat the steps above and replace the command in step 3 with:net user "ACCOUNT_NAME" /active:yes.
Manage your accounts effectively with PowerShell.
PowerShell is a more modern and powerful command-line interface than Command Prompt, offering specialized commands for managing local users.
- Open menuStart, search for "PowerShell", right-click on the result and selectRun as administrator.
- Enter the order
Get-LocalUserand pressEnterto view the list of accounts. - To disable an account, use the command:
Disable-LocalUser -Name "ACCOUNT_NAME". For example:Disable-LocalUser -Name "Local Demo".
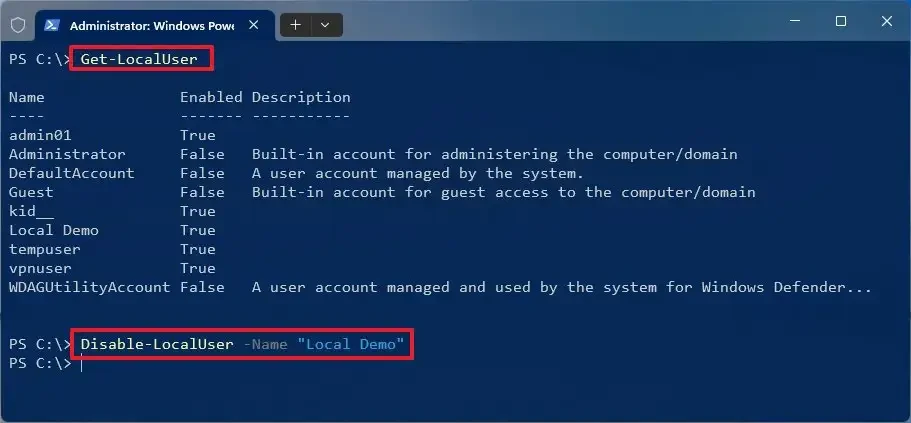
To reactivate your account, you can use the following command:Enable-LocalUser -Name "ACCOUNT_NAME".
Perform operations via the Computer Management graphical interface.
For users who prefer a graphical interface, the Computer Management tool is an intuitive option for managing user accounts.
- Open menuStart, search for "Computer Management" and open the application.
- Navigate to the following section:System Tools > Local Users and Groups > Users.
- In the list on the right, right-click on the account you want to disable and selectbarrier.
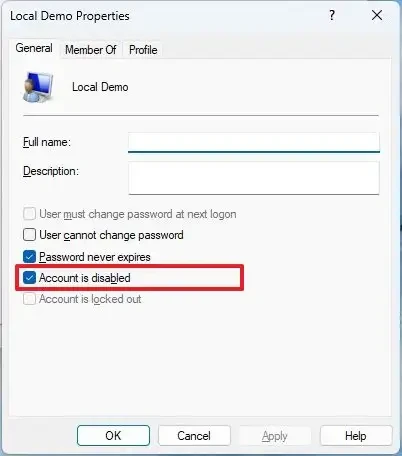
- In the tabGeneral, check the boxAccount is disabled.
- PressApplyand thenOKTo save changes.
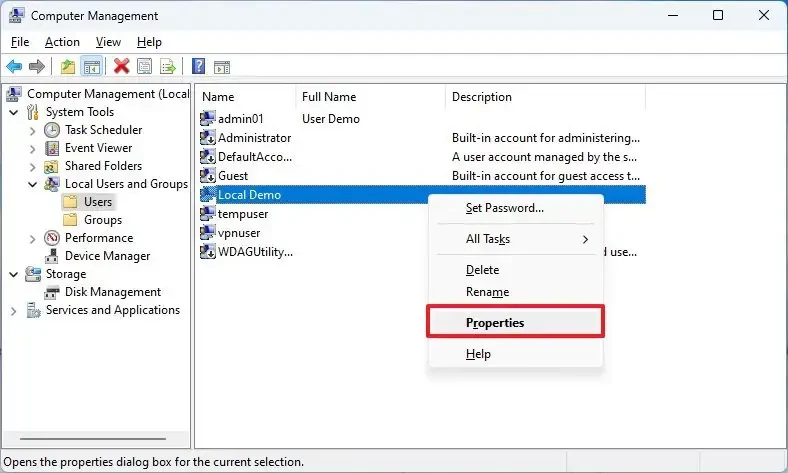
Your account will be disabled immediately. To re-enable it, simply uncheck the "Account is disabled" option.
Block logins for Family accounts via Settings
Windows 11 includes a family management feature, allowing you to easily disable family members' accounts through the Settings app.
- Open the applicationadjustingby pressing the key combinationWindows + I.
- Go to the sectionAccountsand chooseFamily.
- In the family member list, select the account you want to manage and click the button.Block sign in.
- Confirm the action by clicking the button.Block.
That user will be unable to log in until the home administrator restores access. This method is particularly useful for managing children's computer time.